SmartPAC 2 Info Center
SmartPAC 2 Ushers in the Paperless Shop
Jump to:
| Overview |
Info Center Setup |
Navigation, Templates & Scripts |
FAQs and Troubleshooting |
Overview
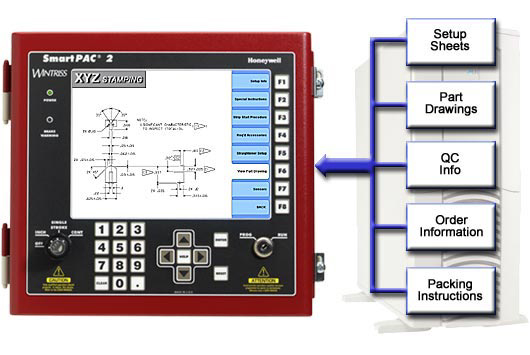
The SmartPAC 2 Info Center is an optional feature that allows you to display setup sheets, drawings, photographs,
and other information right at the press, on the SmartPAC 2's screen. The Info Center replaces the "Tool
Information" selection on the SmartPAC 2's run menu.
When selected, the Info Center opens a web browser window (Microsoft Internet Explorer) that completely fills
the SmartPAC 2's 800 x 600 Pixel screen.
What goes in that window is up to you - you create the documents that are displayed on the SmartPAC 2's
screen. The platformís flexibility allows you to display as much or as little information as you wish;
you can display a simple text-only setup sheet or a screen with navigation links to a full set of part drawings,
press schematics, maintenance records, and more. There is effectively no limit to the amount of information
that can be displayed on the SmartPAC 2ís screen.
Your Info Center documents are stored remotely on a server, Web server, network drive, or shared folder - they are
not stored in the SmartPAC 2. To enable the feature in a SmartPAC 2 that is equipped with the Info Center
option, simply go to the Info Center Setup Page, select a press from the list,
enter the network path to where the Info Center documents for that press are stored, then enter a path/file for
each tool number setup programmed at the SmartPAC 2. Note that the list
of presses on the Info Center Setup Page is automatically created when the SmartView Web Interface is set up.
Therefore, SmartView must be set up before you can use the Info Center Setup Page (see below for SmartView setup
instructions).
Even when the Info Center is installed and enabled, the old "Tool Information" screens are available in the
initialization and program modes. These screens will be displayed in place of the Info Center if the network
is down, server is unavailable, or if no Info Center documents exist for a particular tool.
Info Center Documents
The SmartPAC 2 uses a modified version of Microsoft Internet Explorer to display Info Center documents. The
document types that can be displayed by the Info Center include documents with the following file extensions:
- .htm (or .html)
- .pdf
- .asp
- .php
- .txt
- .bmp
- .jpg (or .jpeg) (less than 500KB file size)
- .tif (or .tiff)
- .gif
- .png
Other file types may be compatible, contact the Wintriss factory at 1-800-586-8324 for more information.
Info Center Setup
Getting Started
These are the basic steps you need to complete to set up the Info Center:
- Connect the SmartPAC 2s to your Ethernet network (LAN)
- Enable SmartView at each SmartPAC 2
- Set up SmartView on the computer that you are using to configure the SmartPAC 2's
- Specify a server or network location to hold the Info Center documents.
- Use Info Center Setup to specify the associated document for each tool in each SmartPAC 2.
Connecting SmartPAC 2 to your Network
Connect the SmartPAC 2 to your Ethernet network the same way you would a computer. There is an RJ45 Ethernet
connector on the left edge of SmartPAC 2's main board. Simply plug a standard network cable into the connector.
The SmartPAC 2's network name is "SPAC2-" and the unit's serial number. If your SmartPAC 2's serial number is
12345678, then the SmartPAC 2's network name will be "SPAC2-12345678".
SmartPAC 2 is set up to get an IP address from a DHCP server. If your installation requires a static IP address,
contact the Wintriss factory at 1-800-586-8324 for information on setting this up.
Enabling SmartView at the SmartPAC 2
Once the SmartPAC 2 is physically connected to the network, you must enable SmartView at the SmartPAC 2:
- Turn the Program/Run key to Program.
- Press the "1" and "Clear" keys simultaneously to access the Initialization mode.
- Use the cursor keys to scroll to
SETUP NETWORK and press "Enter".
- Use the cursor keys to scroll to
SMARTVIEW FUNCTION and press "Enter" to enable SmartView.
Pressing "Enter" will toggle the selection from ENABLED to DISABLED.
Verify that the function is enabled before exiting the screen.
- Press "Reset" twice to exit the initialization menu.
Setting up SmartView
Since the SmartPAC 2 Info Center gets its documents from a remote server, you need to tell each SmartPAC 2 where on
the network to "look" for the information. You do this by specifying a network path, and sending it to each
SmartPAC 2 using the SmartView Web interface. SmartView allows you to view press status over your network,
and provides access to the utilities that are used to configure SmartPAC 2's communication functions such as the
Info Center and E-Mail messaging. If you've already set up SmartView, you can skip to the next section.
To verify that SmartView has been set up on this computer, go to
SmartView. If SmartView has been set up, the SmartView main page will appear, showing the status of your
SmartPAC 2-equipped presses. If SmartView has not been set up, the SmartView setup page will be displayed.
Click on the Setup Help link and follow the instructions to set up SmartView.
If you are unsure as to whether or not a particular SmartPAC 2 has the Info Center Option, go to
SmartView, click on the Detail link for the press, then click on "Installed
Options". This page will show all of the options installed in that SmartPAC 2. If "Info Center"
is listed, then this feature is available for that SmartPAC 2. If it is not listed, it can be added to
an existing SmartPAC 2, call 1-800-586-8324 for upgrade information.
Specifying the Network Location
The Info Center retrieves a document from a specified location and displays it in a web browser window on the
SmartPAC 2 screen. The next step in the Info Center setup is to identify for each SmartPAC 2
the server on which its Info Center documents are stored.
NEW! Path Maker
We added a simple form that can build the Info Center network path for you. Click on the Path Maker link on the Info Center setup page:
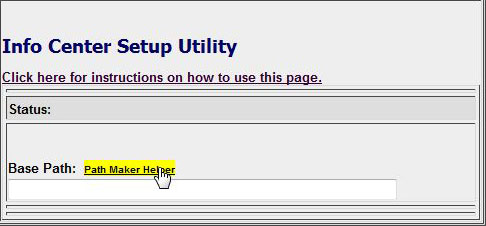 Path Maker Link (highlighted)
A popup window will appear with the Path Maker form. Simply enter the information about the server, document path, and domain login, and the
correct path will be created.
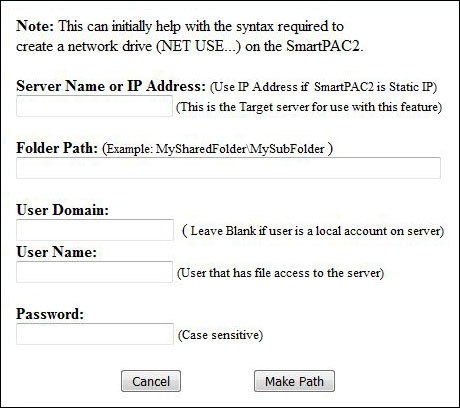 Path Maker Window
The path to the Info Center Documents can also be entered manually:
- Click here to open the Info Center Setup Page in a
new window
- Select a SmartPAC 2 from the pull-down menu.
- In the field labeled "Base Path:", enter the network path to the server that will hold the Info
Center documents for the selected SmartPAC 2. Prefix this entry with
NET USE T:. This is required, and will
cause the SmartPAC 2 to map it's "T" drive to the base path location. If the Info Center documents will be in a shared
directory where no log-in is required, the path can be as simple as:
NET USE T: \\ServerIPaddress\
Please note that Info Center requires that you specify a server IP address instead of the server name.
If the location is a network drive or server that requires a log-in, the Remote Path should use the following
format:
NET USE T: \\ServerIPaddress /Persistent:no
			/user:Domain_Name\UserName Password
The items indicated in red above should be replaced with the actual names used on your network.
The items in black should be entered exactly as shown above. When log-in is required, the SmartPAC 2
will map the Info Center server as its "T" drive.
If all of the Info Center documents for a particular SmartPAC 2 will be stored in the same directory or
sub-directory on this server, you can also add these to the Base Path. For example, if the Info Center
documents were stored in a directory called "InfoCenter", with the files for this
specific SmartPAC 2 in a sub-directory named "Press1", you could specify the path as follows:
NET USE T: \\ServerIPaddress\InfoCenter\Press1 /Persistent:no
/user:Domain_Name\UserName Password
If the Info Center files for a SmartPAC 2 will be distributed throughout different directories on the server,
do not specify the directory/sub-directories in the Base Path. Instead, we will add these to the File
Designation for each particular tool in the next step.
If the Info Center documents are stored on a web server, the path should be in the format:
http://www.DomainName.com/DirectoryName/
If log-in information is required, contact your web server administrator for log-in instructions.
- Once you've entered the Remote Path, click on the "Save" button. This will save the remote path
information to the SmartPAC 2. You are now ready to specify an Info Center document for each tool.
Info Center File Designation
In the previous step, we told the SmartPAC 2 where to look for the Info Center documents. In this step,
we will tell the SmartPAC 2 exactly which file to display for each tool number that has been programmed into the
SmartPAC 2. Think of the File Designation as an extension to the base path.
- If it is not open already, click here to open the Info
Center Setup Page in a new window.
- Select a SmartPAC 2 from the pull-down menu. The Setup page will create a list of the tools that have been
programmed into this SmartPAC 2. To the right of each tool listing there is a field that shows the
Info Center document for the tool. If no Info Center document has been specified, the field will be
labeled "Empty".
- To specify an Info Center Document for a tool, replace "Empty" with the file name. Depending on
how you've organized your Info Center Files, you may also need to enter some path info into this field along
with the file name. For example, if your Info Center documents are stored on Server1 in a directory named
"InfoCenter" and in the previous step you entered a Remote Path of:
\\Server1\, you
would need to put the directory name in with the file name in the "File Association" field. So if for
tool number 1234 you wanted to open a document named setup.htm, you would enter
InfoCenter\setup.htm in the File Association field next to tool number 1234.
Another way to put it is that you must specify a complete path to the Info Center document using a combination
of the "Remote Path" and "File Association" fields. Exactly how you split this up is determined by the
directory structure on the server holding the Info Center Files.
- When you've entered all of the file associations (and paths if necessary), click the "Save" button. This
will save the information at the SmartPAC 2.
The Default Function
The top line under File Designation is labeled "Default". When you put a file designation in this Default field, and enable the Default
function with the check box to the right of the field, the specified default file will be displayed on the SmartPAC for any tool that does
not have a file designation specified. This is most likely to occur when a new tool is created at the SmartPAC. The Default
function can also be used if you wish to display the same document for all the tools on a SmartPAC. This is done by simply entering
the document's path/name as the Default File Designation, and leaving the fields for the individual tools empty.
Testing the Info Center
To test the info Center at the SmartPAC 2:
- Turn the SmartPAC 2 key switch to "Program"
- Go to the Initialization menu by pressing the "1" and "Clear" keys simultaneously.
- Use the cursor keys to scroll to "Setup Network" and press "Enter".
- Scroll to "Setup Info Center" and press "Enter" to open the Info Center Utility
The Info Center Utility allows you to test-view the Info Center documents for all of your tools without having to
load each tool individually. Simply use the cursor keys to scroll to a tool, and press "Enter" to view the
Info Center document. If the document does not display, verify that the path and file name are correct,
and that the server is available. Refer to the Troubleshooting section below for more
information.
Navigation
Navigation
Selecting "Info Center" from the SmartPAC 2's main run menu opens the file associated with the currently loaded tool
in a full-screen browser window. If the associated file is an HTML or other web document, you can navigate to
additional pages using hyperlinks. However, since the SmartPAC 2 has no mouse with which to click, all
navigation must be keyboard based.
Using the SmartPAC 2's Built-In Function Key Navigation
SmartPAC 2 systems with main firmware versions 7.1.4 and later are equipped with a feature that enables the SmartPAC 2 to automatically display
a list of available Info Center documents for each tool, and associate each document with a function key. When the
function key is pressed, the SmartPAC 2 will display the linked document.
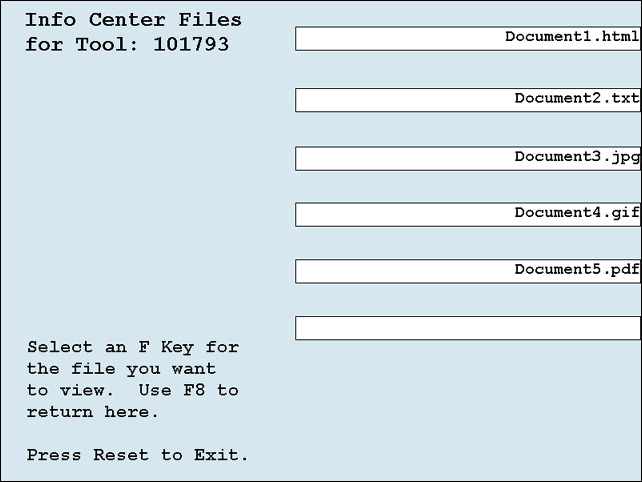
Sample SmartPAC 2 Built-In Info Center Navigation Screen
With 8 function keys, the SmartPAC 2 displays the first 8 documents (sorted alphabetically) in the directory.
If the directory contains more than 8 documents, they can be accessed by using the SmartPAC 2's cursor keys.
To use this feature:
- At the server, create a directory under the Base Path for each of the tools in the SmartPAC 2. The
directory names must exactly match the tool numbers. (see below)
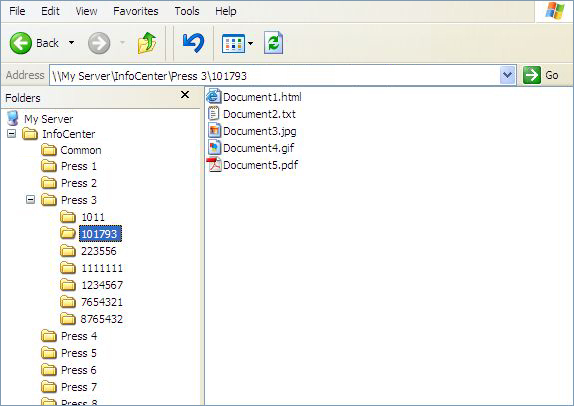 Directory structure for SmartPAC Built-in Navigation Directory structure for SmartPAC Built-in Navigation
- Place the Info Center documents for the tools in each tool's directory.
- On the Info Center setup page, set the Base Path as described above.
- Select a SmartPAC 2 from the pull down menu.
- Enable the Default feature by clicking the check box to the right of the Default field.
- Put an asterisk (*) in the Default field.
- Click the Save button.
- Repeat this procedure for the other SmartPAC 2s.
The "Common" Directory
Notice the directory named "Common" in the figure above. If you include a directory so named under the Info Center base Path,
any documents that you place in the directory will be displayed using SmartPAC 2's built-in navigation on all of the SmartPAC 2's that share
the base path. These documents will be shown on the SmartPAC's built-in Info Center navigation screen at the end - after all of
the documents in each tools specific directory.
Other Navigation Methods
Other more advanced navigation schemes are possible. Please contact the Wintriss Factory for more details.
FAQs and Troubleshooting
My SmartPAC 2 has no menu choice for Info Center, instead it has "Tool Information". What's wrong?
The Info Center option is probably not installed in this SmartPAC 2. To check, go to select "Installed
Options" from the SmartPAC 2 initialization menu. If Info Center is not listed, then the SmartPAC 2 does not
have the option. Call 1-800-586-3284 for information on how to order it.
I can't display Info Center documents on my SmartPAC 2, what should I check?
At the SmartPAC 2, go to initialization and check the following:
- Under "Installed Options", verify that the Info Center is installed.
- Under "Setup Network" verify that the SmartView Function is enabled.
- Under "Setup Network"/"Setup Info Center" verify that the Remote Path matches the location of your
Info Center documents on the network. Also verify that the File Extension matches the one used
by your Info Center documents (remember, .htm and .html do not match).
At your computer check the following:
- Open Internet Explorer and go to SmartPAC2.com.
The SmartView Main Page should appear showing all of your connected presses. If not, go to the
SmartView Setup Page and configure
SmartView.
- If SmartView checks out, go to the Info Center Setup Page, select the press in question from the pull down menu, then click on
the "Get Info Center Path" button. Ensure that the path that appears in the form field matches the
network location for the Info Center documents. Also ensure that the path location is accessible to
the SmartPAC 2.
Can I get the Info Center option for my SmartPAC 1?
No. The SmartPAC 1 has insufficient screen resolution and lacks network compatibility.
Contact the Wintriss Factory (1-800-586-8324) for information on how to upgrade to SmartPAC 2.
|


